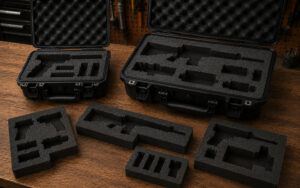
Customising foam inserts involves measuring equipment accurately, selecting the right foam material, planning an effective layout, and cutting the foam to create secure compartments for each item.
Custom foam inserts help protect equipment from movement, impact, vibration, and damage during storage or transport. They are commonly used in protective hard cases for cameras, drones, tools, electronics, medical equipment, firearms, scientific instruments, and specialist equipment.
Why use custom foam inserts?
Standard foam inserts may not provide enough support for valuable or delicate equipment. If equipment can move inside the case, it may be exposed to knocks, scratches, vibration, or pressure damage during transport.
Custom foam inserts help:
- Keep equipment securely in place
- Reduce movement during transport
- Protect delicate surfaces and components
- Improve organisation inside the case
- Make equipment easier to access
- Create a more professional presentation
They are especially useful when transporting equipment regularly or storing sensitive items in demanding environments.
What types of foam are used for custom inserts?
Different foam materials are used depending on the type of equipment and the level of protection required.
- Polyethylene foam: A durable high-density foam with strong impact resistance and moisture resistance.
- Polyurethane foam: A softer foam suitable for delicate surfaces and sensitive equipment.
- EVA foam: A dense foam commonly used for clean, precise custom layouts.
The correct foam depends on the size, weight, and fragility of the equipment being protected.
What tools are needed to customise foam inserts?
Creating custom foam inserts requires accurate measuring tools and suitable cutting equipment.
Common tools include:
- Measuring tapes and rulers
- Digital callipers
- Sharp craft knives
- Electric foam cutters
- Hot wire cutting tools
- Templates and marking tools
- Protective eyewear and dust masks
For professional results, CNC cutting machines are often used to create highly accurate shapes and clean edges.
How do you measure equipment for foam inserts?
The first step is measuring every item that will be stored inside the case, including accessories and attached components.
This may include:
- Cameras and lenses
- Drones and controllers
- Medical instruments
- Tools and chargers
- Testing equipment
- Firearms and accessories
- Cables and batteries
Measurements should include the full height, width, and depth of each item, including handles, scopes, connectors, knobs, or protruding parts.
Small clearance gaps should also be allowed so items can be inserted and removed easily without forcing them into the foam.
How do you plan a foam insert layout?
A good layout helps maximise space while keeping equipment secure and organised.
When planning the layout, consider:
- The size and shape of each item
- Weight distribution inside the case
- Protection between compartments
- Ease of access
- Space for accessories and cables
- Foam thickness around delicate equipment
Heavier items are usually placed near the base of the case, while delicate components should have additional foam protection around vulnerable areas.
It is also important to leave enough foam between compartments to maintain strength and prevent items from knocking against each other.
How do you cut foam inserts accurately?
Accurate cutting is important to ensure the equipment fits securely without excessive pressure.
A typical process includes:
- Tracing or marking the equipment shape onto the foam
- Cutting the outline gradually
- Removing foam in layers if different depths are needed
- Testing the fit regularly
- Making small adjustments where necessary
Electric foam cutters and hot wire tools can help create smoother and more consistent edges than standard blades.
Complex shapes may require multiple cuts to create proper support around handles, lenses, scopes, or irregular surfaces.
How tight should equipment fit inside foam inserts?
Equipment should fit snugly enough to prevent movement while still being easy to remove from the case.
A proper fit should:
- Prevent rattling or shifting
- Support the equipment evenly
- Avoid pressure on fragile components
- Allow easy removal without force
- Keep accessories separated and organised
If the fit is too loose, the equipment may move during transport. If the fit is too tight, pressure may be placed on screens, lenses, controls, or sensitive parts.
Why are custom foam inserts useful for protective hard cases?
Custom foam inserts improve the overall protection provided by a hard case by reducing internal movement and helping absorb shock during transport.
They are particularly useful for:
- Professional equipment transport
- Travel and field work
- Marine and offshore environments
- Photography and filming equipment
- Medical and scientific equipment
- Industrial tools and electronics
Combined with a waterproof and impact-resistant hard case, custom foam inserts help create a more secure environment for valuable equipment.
How do you test a custom foam insert?
After cutting the foam, the equipment should be tested inside the case before regular use.
To check the fit:
- Place all equipment into the foam compartments
- Close the case fully
- Gently move the case from side to side
- Listen for movement or rattling
- Check that no components are under excessive pressure
The equipment should remain secure without shifting during movement.
How do you maintain custom foam inserts?
Regular maintenance helps keep foam inserts in good condition and ensures continued protection for the equipment stored inside.
Maintenance should include:
- Removing dust and dirt from the foam
- Checking for wear or compression
- Replacing damaged sections when needed
- Keeping the case dry and clean
- Reassessing the layout when equipment changes
Well-maintained foam inserts can provide long-term protection and help extend the life of both the case and the equipment inside.